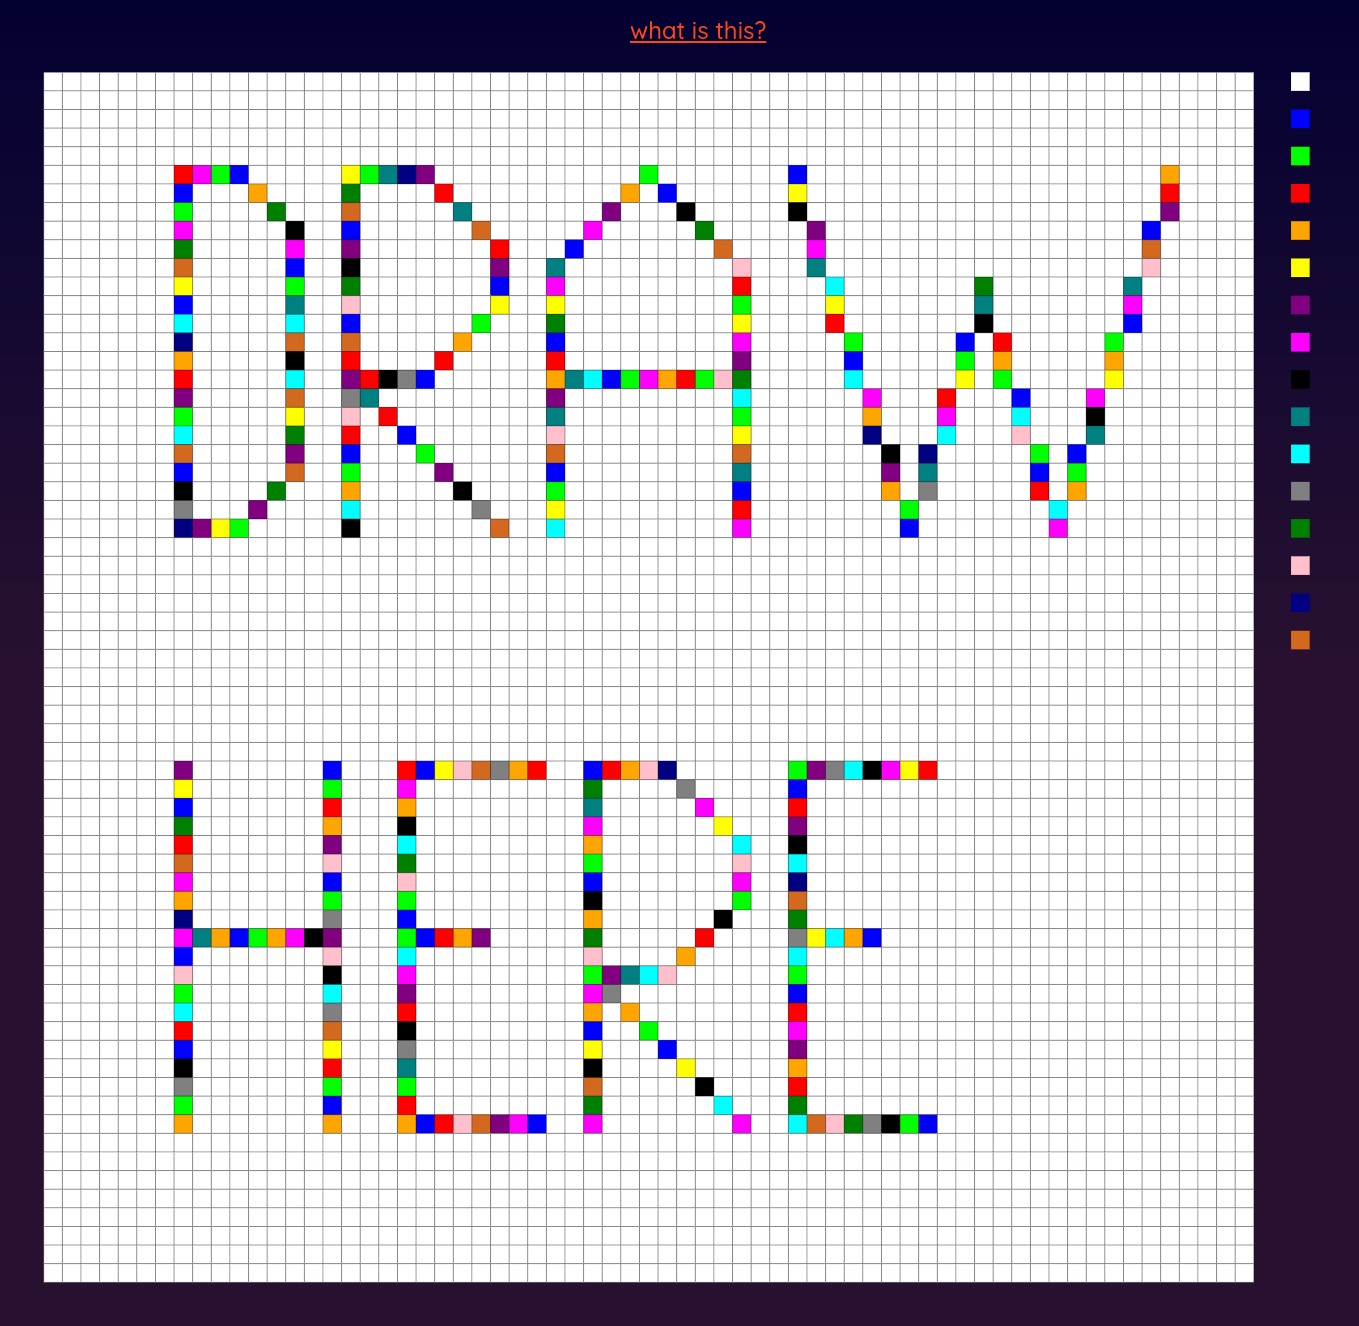
How I Made justonecanvas.live
- 17 minsHoping to make the most of the pandemic, I decided to do a side project that would allow me to learn some new languages and technologies. This is my first attempt at a React website with Golang backend supported by a Redis cache with MongoDB, all connected through WebSockets.
This doesn’t want to be a step-by-step development guide, but rather a summary of all the things I learned.
Why?
I’ve been intrigued by Golang for quite some time and I wanted an excuse to use it.
It may seem like a boring motive - and it kinda is - but I’ve spent the last few months reading very nice things about other people’s experiences with the language to the point that I needed to try it. Because Golang is marketed as a simple yet very performant language, I wanted a project that required a good degree of performance optimization. For this reason I chose to replicate Reddit’s 2017 r/place.
r/place was essentially a giant 1000x1000 pixel canvas that allowed Reddit users to draw art masterpieces collaboratively (or at each other’s throat). Each player can choose from an array of possible pixel with different colors and place it on the canvas.
It was really fun and I thought it could serve as a good learning platform.
Docker
This was also my first experience with Docker. It was kind of incredible: being able to simply spin up a container with my server/Redis/Mongo without any kind of provisioning or configuration (almost) was a game changer.
docker-compose also smoothed operations by providing a simple, convenient way of describing my containers and allowing them to talk to each other.
Backend
I loosely followed Reddit’s blog post with regards to its implementation. Obviously I would never pretend to reach r/place’s user base, so I kept it simpler.
Gin
With regards to web frameworks I chose Gin: it’s simple, popular, performant. I didn’t really do anything special with it, I simply needed it to define my endpoints:
func (ds *dserver) MapRoutes() {
	apiV1 := ds.router.Group("api/v1")
	ds.canvasRoutes(apiV1)
}

func (ds *dserver) canvasRoutes(api *gin.RouterGroup) {
	canvasRoutes := api.Group("/canvas")
	{
		...

		ch := rest.NewCanvasHandler(ds.logger, h, cs)

		canvasRoutes.GET("/", ch.Get)
		canvasRoutes.GET("/ws", ch.GetWs)
	}
}
Redis
Thanks to Docker, setting up Redis was very simple. In their blog post, Reddit explained how they used a BITFIELD to store each pixel of the canvas. BITFIELD allows us to treat a Redis string as an array of bits and referencing specific integers of varying bits at arbitrary offsets. Thanks to go-redis I implemented it like this:
for i := 0; i < constants.Squares; i++ {
	err := client.BitField(ctx, "canvas", "SET", "u4", "#"+strconv.Itoa(i), c.Cells[i].Color).Err()

	if err != nil {
		...
	}
}
Which, at startup, initializes each unsigned 4 bit color of the canvas at its respective offset with the data gathered from MongoDB.
It’s also possible to execute multiple commands at once, like I did when getting data out of Redis.
c = &Canvas{}

var args []interface{}

for i := 0; i < constants.Squares; i++ {
	args = append(args, "GET")
	args = append(args, "u4")
	args = append(args, "#"+strconv.Itoa(i))
}

val, err := r.redis.BitField(ctx, "canvas", args...).Result()

if err != nil {
	...
}
MongoDB
Some may find the choice of MongoDB weird or redundant as they are both NoSQL solutions, both can run in memory, and the fact that I could technically use just Redis to store data on disk. The only reason why I used MongoDB is because I didn’t need any kind of relational DB and I wanted a simple component to write data on disk. We’ll see how they communicate with each other in the next paragraph.
Setting up MongoDB was simply a matter of:
collection := client.Database("canvas").Collection("canvas")
err = collection.FindOne(ctx, bson.D{}).Err()
if err != nil {
	c := &canvas.Canvas{ID: "1"}
	cell := canvas.Cell{
		Color: 0,
	}
	for i := 0; i < constants.Squares; i++ {
		c.Cells[i] = cell
	}

	collection.InsertOne(ctx, c)
}
Which in case a canvas document can’t be found generates a new oone and fills it with white squares.
I took the opportunity to do some little tests with Redis and Mongo. In the first version of justonecanvas I developed a very simple CRUD application with Mongo, and only after that I moved to implement a Redis version. I profiled both systems with JSON and binary formats, specifically Golang’s own gob, and the binary format allows for a much faster (50%) response time.
Numbers show times in millisecond that gin took to handle a GET on /api/v1/canvas, therefore returning the entire board. No huge differences there.
WebSockets
This was also the first time I dealt with WebSockets. In a situation like this, where you have the need for full-duplex communication over a browser, it’s the ideal solution.
As for implementation I looked at gorilla/websocket’s chat example, which provides a Hub that stores the references to all clients’ connections as well as a way to broadcast messages to all of them.
What’s important to notice here, is that 2 goroutines are allocated for each client, ReadPump and WritePump, which obviously handle read and write operations. This however didn’t seem like a very scalable solution, as I’ll discuss below.
On the Typescript side, I made sure to set the connection’s binary type to arraybuffer: a generic fixed-length container for binary data which allows for the creation of “views” using Javascript typed arrays.
Sequence Diagrams
Those are the building block, but how do they communicate with each other?
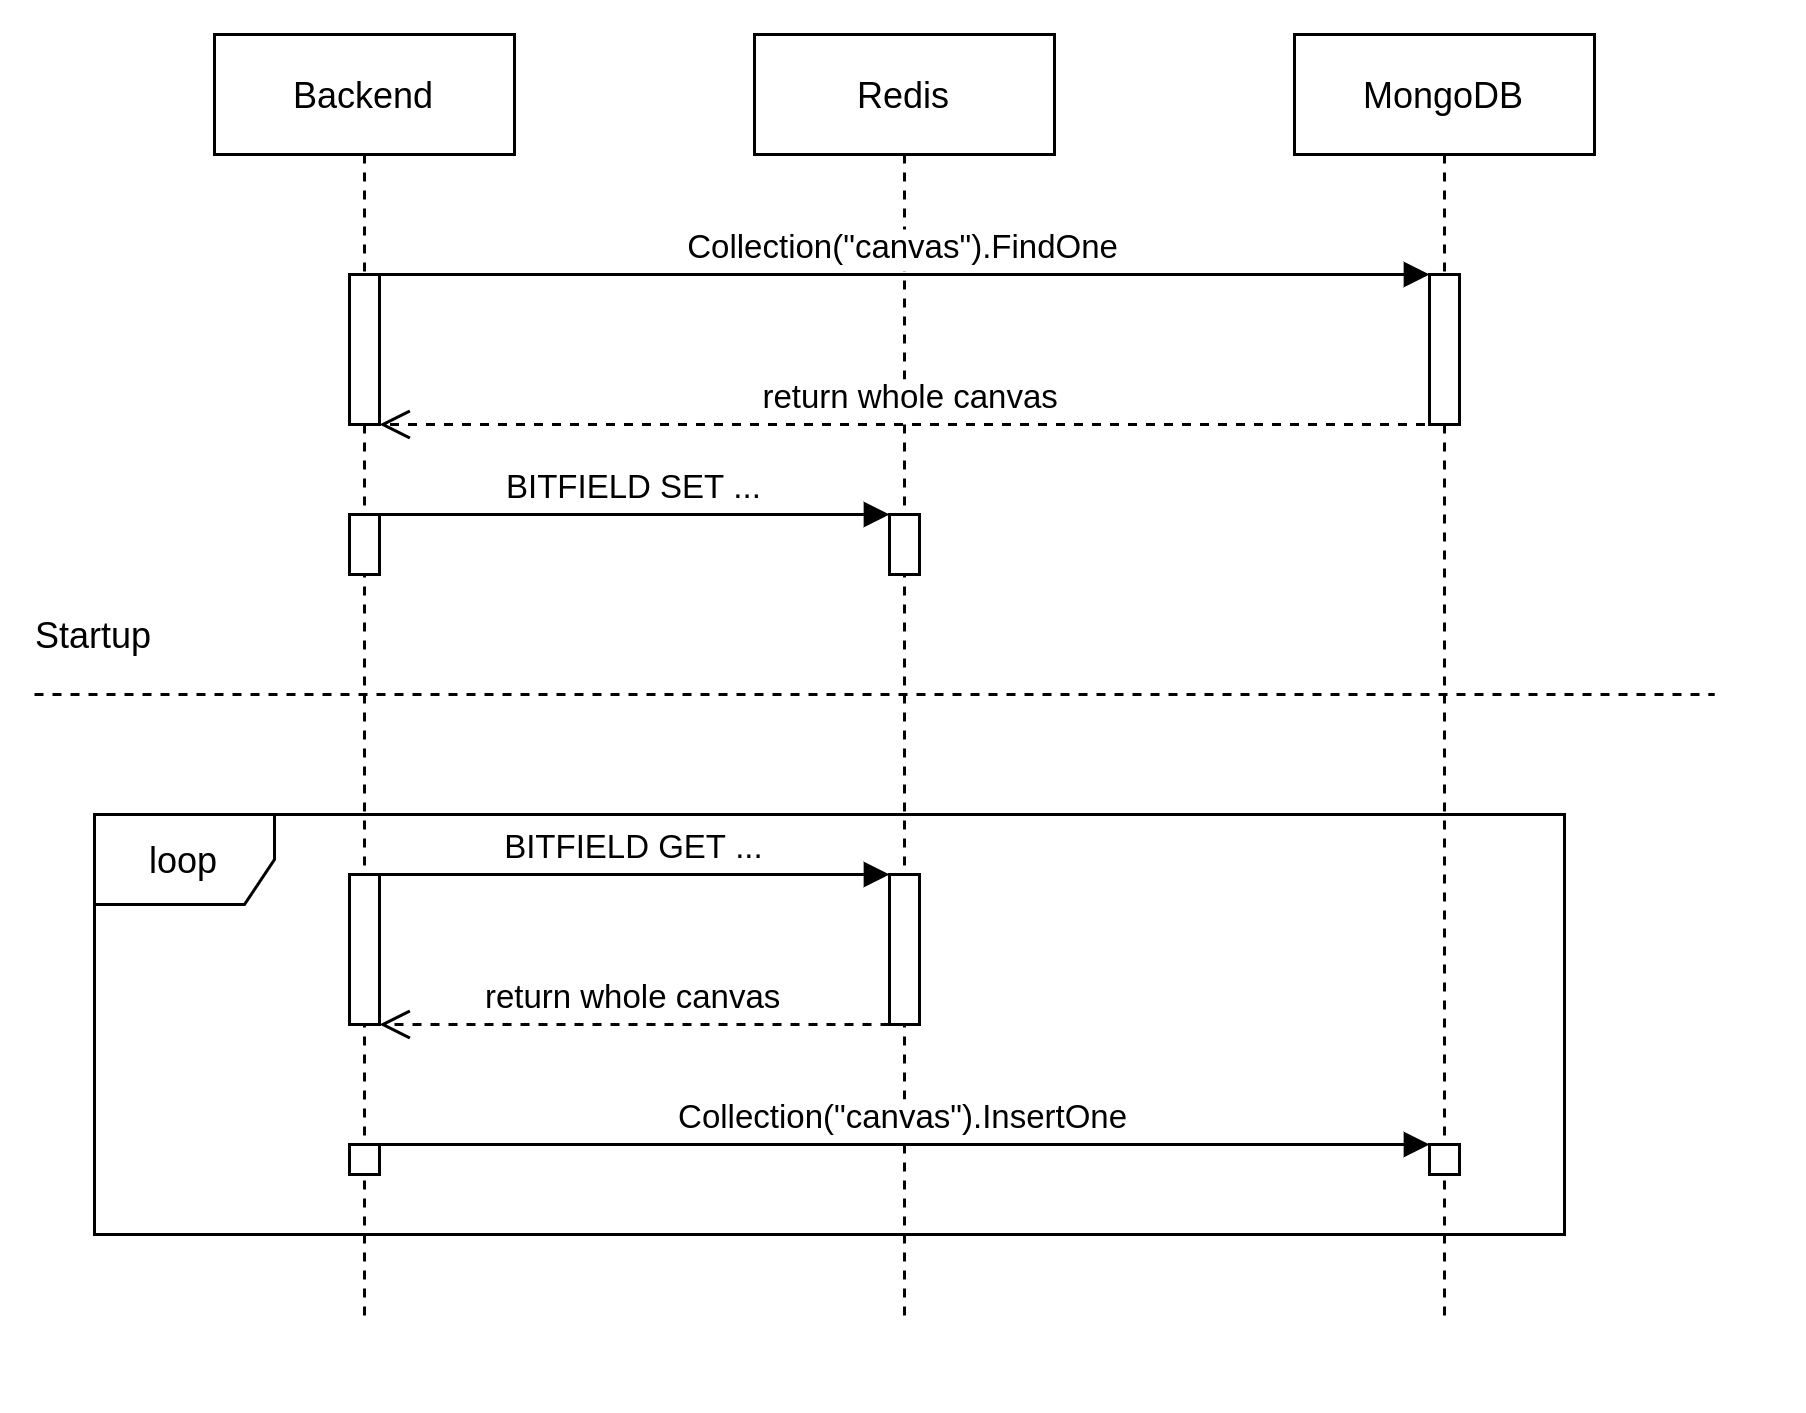
At startup, our Golang backend simply populates the Redis container. It reads the entire canvas from MongoDB and sets a BITFIELD. This is actually a major difference from Reddit’s approach: I treat Redis as an in-memory DB and MongoDB simply as a solution to store the canvas on disk.
Then, a goroutine handles a 10 seconds periodic write to MongoDB, so as to update its version.
Let’s see what happens when a user establishes a connection.
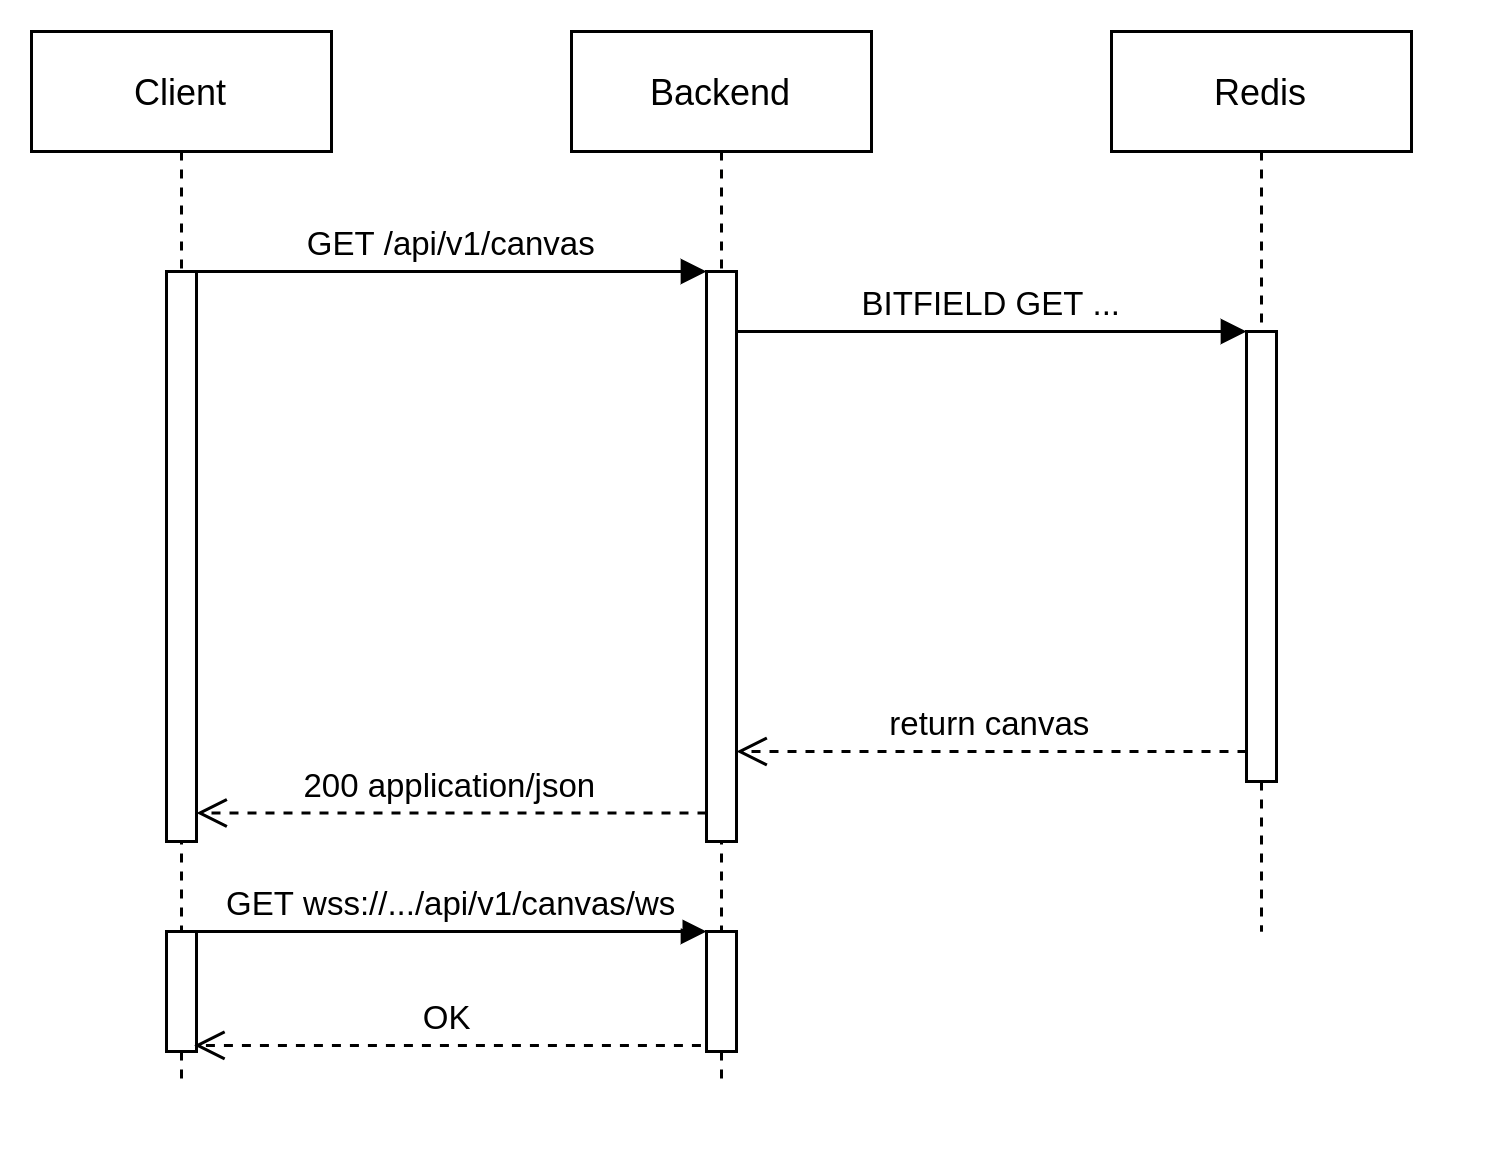
In this instance, a client makes 2 separate requests: the first is a simple REST call to /api/v1/canvas to get the entire canvas in JSON form that displays to the user, the second to /api/v1/canvas/ws is used to establish a WebSocket connection and signal that it’s ready to receive other players’ moves.
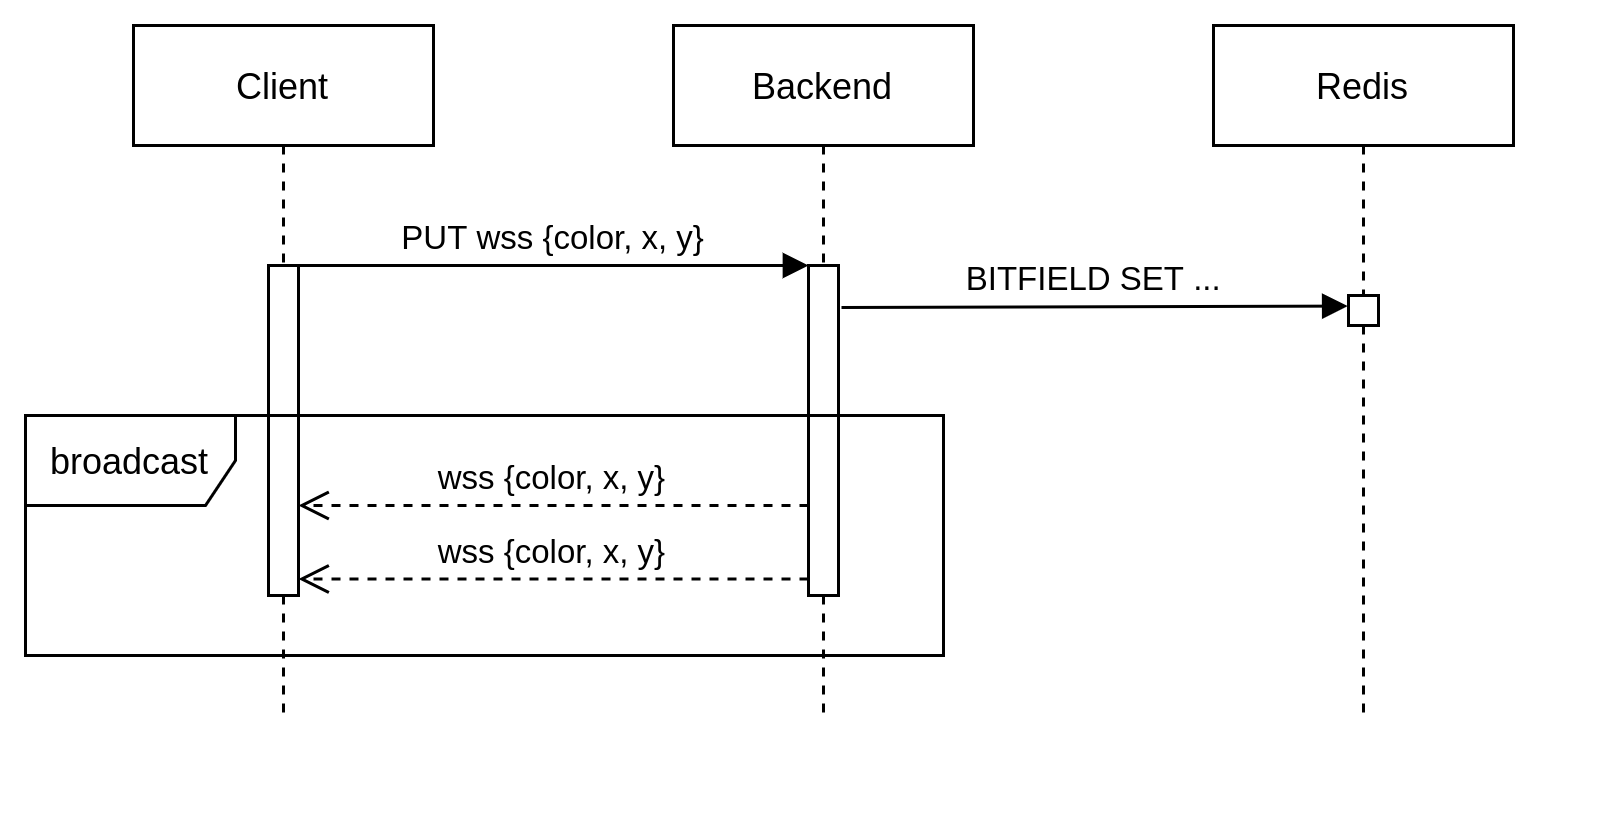
At last, what happens when a user moves? Thanks to WebSocket’s full-duplex nature, it’s simply a matter of encoding a message like {color,x,y} and sending it. Our backend then stores the move in Redis’ canvas and proceeds to broadcast the same message to all players.
Rate Limiting
I don’t trust the internet.
And neither should you when you grant them free, public, write access to a service.
Justonecanvas has only two API endpoints: a regular REST /api/v1/canvas that returns the current state of the canvas in JSON format, and a WebSocket /api/v1/canvas/ws that establishes the connection and sets the client for receiving move updates.
I decided to limit the damage possible on the former by implementing a simple sliding window technique. That should take care of people who want to spam the main endpoint in order to get the current state of the game.
I was unsure as to how rate limit on the WebSockets side. Eventually I settled for a IP-based map that stores the time a specific IP address made a move. Before accepting the next move, a read is made in order to check that a move wasn’t made less than a second before.
type Hub struct {

	...

	ips map[string]time.Time

	lock sync.RWMutex

	...
}
This was a rather simple but effective solution, though load-testing revealed some problems as discussed below.
Frontend
Let me preface by admitting that UI/UX is not my thing. As I’ve already mentioned, I needed a project as an excuse to work with Golang, so I didn’t really care to make it beautiful. Because I am not well-versed in the art of frontend development - and not having ever developed User Interfaces outside of mobile applications - I decided to go for a very basic create-react-app approch.
Admittedly, this ended up being overkill. For a web app this simple, a complex solution like React is not needed. There’s no need to track any state, and the project consists only of 2 pages (one of which is /about). Most of the frontend development involved react-konva
React-Konva
This really cool Javascript library provides declarative and reactive bindings to the Konva Framework. I managed to create the 65x65 canvas, which in Konva terms is a two-dimensional array of Rects (in my case effectively squares). While there are much bigger clones of r/place, my goal here was to learn, not replicate the same experience. Furthermore, thanks to Docker I built the entire system to be size-indipendent: making it bigger should be trivial given more power.
Aside from regular pixel-squares, the right side of the canvas shows all colored-squares available to use. By making them draggable, the user can drag-and-drop them on any regular square, therefore sending a WebSocket message as described above.
The first implementation wasn’t very performant, so I looked at the tips available to make it smoother. What made the trick was splitting the board into layers like this. That made the canvas drag and zoom-in performance tolerable, but I’m sure if I worked on it some more I could improve it much further. For now though, it does the job.
Load Testing
I decided to test the capabilities of gorilla/websocket with artillery. It allows me to make thousands of fake users that send predetermined moves to the server.
Artillery is setup like this:
# loadtest.yml
config:
  target: "ws://localhost:8080/api/v1/canvas/ws"
  processor: "./my-function.js"
  phases:
    - duration: 600  # Test for x seconds
      arrivalRate: 30 # Every second, add y users
      name: "Ramping up the load"
scenarios:
  - engine: ws
    flow:
      - function: "createTimestampedObject"
      - send: ""
      - think: 600 # do nothing for 10m and disconnect
// my-functions.js
module.exports = { createTimestampedObject };

function createTimestampedObject(userContext, _, done) {
  userContext.vars.color = 1;
  userContext.vars.y = 1;
  userContext.vars.x = 1;

  return done();
}
This is run with artillery run loadtest.yml.
The idea is to spawn 30 users per second for 600 seconds. Each user sends a simple [1,1,1] (blue pixel at position 1,1) message and then waits 10 minutes, whilst receiving all subsequent messages.
I began load testing while I was on vacation, so I could only test with my MacbookPro. I noticed that at around 4800 connections, regardless of the number of allocated cores to docker, the server would stop accepting new clients. I concluded it was most likely due to a limit on file descriptors, as described by this slide by eranyanay’s work on Golang and WebSockets. The problem didn’t really present itself on my Linux machine nor on Digital Ocean’s droplet.
At around 8000 players however, the server would stop and crash. It turned out to be a problem related to my websocket rate limiter. Each websocket connection spawns a Read goroutine and a Write goroutine, and in the first version I didn’t really account for concurrent access to the map that stores all IP addresses and their last move. As response time grows with new players access, there’s a higher chance of this happening, so I had essentially 2 possible solutions: either a sync.Map or a regular map with a RWMutex. Eventually I settled with the latter as I believed it would better suit my use case, given also the fact that read access would be responsible for taking care of possible spammers (it checks if a player’s last move was made more than a second prior).
c.hub.lock.RLock()
diff := time.Now().Sub(c.hub.ips[ip]) // time difference since last move
c.hub.lock.RUnlock()

if int(diff.Seconds()) >= 1 {

	// make move

	c.hub.lock.Lock()
	c.hub.ips[ip] = time.Now() // store current time
	c.hub.lock.Unlock()
}
With this out of the way, I was able to load test up to around 15.000 real-time users. This is far form the results that some are able to get out of Golang, but I still consider it a decent result considering the single core available on a 5$ Digital ocean droplet.
I suspect I couldn’t go much further because of some problems related to goroutine handling. I wasn’t able to pinpoint it exactly, but pprof led me to believe that at some point, as the amount of goroutines grow (2 per client), the application would have problems handling all of them, and would crash.
My next step will be to apply what eranyanay did in his step 3: allowing a single goroutine to detect when a connection has new data that is available to read/write, therefore limiting the amount of goroutines created.
For now though, I’m happy with the results and I doubt justonecanvas will receive such a big amount of users.
Digital Ocean
Thanks to Docker’s flexibility, setting up my server was just a matter of selecting a Docker droplet and docker-compose up.
I had no experience with Nginx. Making sure that WebSocket connections would be upgraded and http traffic redirected to https was just a matter of:
  map $http_upgrade $connection_upgrade {
      default upgrade;
      ''      close;
    }

  # redirect www -> non-www

  server {
    server_name www.justonecanvas.live;
    return 301 $scheme://justonecanvas.live$request_uri;
  }

  # redirect http -> https

  server {
    listen 80;
    server_name justonecanvas.live;
    return 301 https://justonecanvas.live$request_uri;
         }

  # read the ssl certificate / key when listening on https

   server {
    listen 443 ssl;
    server_name justonecanvas.live;

    ssl_certificate /etc/nginx/certs/fullchain.pem;
    ssl_certificate_key /etc/nginx/certs/privkey.pem;

    access_log /var/log/nginx/data-access.log combined;

    # serve the static files

    location / {
      root /usr/share/nginx/html;
      try_files $uri /index.html;
      }
The only annoying part was setting up https, specifically working with certbot. For a while, I considered the option of implementing a certbot image inside Docker, so as to make https deployment 100% platform-indipendent. This however was more of a pain than I anticipated. I eventually opted for a droplet-based guide to handle it outside of Docker, and then setup my frontend image to mount the file from host like so:
  client:
    volumes:
      - /etc/letsencrypt/live/justonecanvas.live/fullchain.pem:/etc/nginx/certs/fullchain.pem
      - /etc/letsencrypt/live/justonecanvas.live/privkey.pem:/etc/nginx/certs/privkey.pem
Conclusions
Again, this doesn’t want to be a guide on any of the topics covered. It was just my recollection of the many things I learned while developing justonecanvas.live.
Hope you found it useful too.
Giulio Lodi
Flutter RubyOnRails Rust. One espresso at a time.